Extensions
Extensions are how you connect your devices and systems to Zelos. Built with the Zelos SDK, they turn an integration into a one-click install, so you can stream, visualize, and control hardware without writing code.
For example
Install the CAN extension and you can view and send data on the bus right away, with no integration code of your own.
What Are Extensions?
Zelos supports two extension hosts:
- Agent extensions run on the Zelos Agent and provide data acquisition, actions, and device integrations.
- App extensions run as sandboxed web UIs, each in its own tab in the app.
This page focuses mostly on marketplace usage and agent-extension runtime management. For app-extension authoring and bridge details, see Develop App Extensions.
Agent extensions provide:
Data Acquisition
- Decode bus protocols (CAN/CAN-FD, Modbus, MQTT, OPC-UA, Ethernet/Protobuf, Serial)
- Interface with test equipment (National Instruments, Opal-RT HIL boxes, oscilloscopes)
- Stream from custom hardware and sensors
- Parse proprietary file formats and logs
Device Control
- Execute commands on hardware via actions
- Automate test sequences
- Control parameters in real-time
- Trigger hardware events from the app
App Workflows
- Build custom dashboards and workflow UIs inside Zelos
- Launch installed app extensions from the sidebar rail or its
⌄menu - Match Zelos theme and workspace context through the app-extension bridge
Finding Extensions
Marketplace
The Extensions marketplace contains integrations for common hardware, protocols, and use cases. Open it from the Extensions view in the sidebar.
- Click Extensions in the sidebar rail.
- Browse the MARKETPLACE section for available extensions.
- See your own extensions in the INSTALLED section. Each row shows the agent it is installed on.
Click any extension to open its details in a tab. The details tab shows the README, version, author, and categories, plus the Install, Update, and Uninstall buttons.
Click the ⋮ menu in the MARKETPLACE header to access marketplace actions:
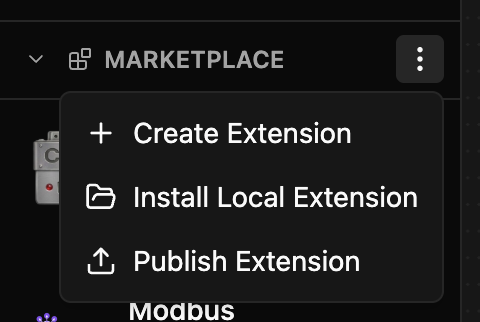
- Create Extension: Generate a new extension project from a template.
- Install Local Extension: Install an extension from a folder on this computer.
- Publish Extension: Open the marketplace website to submit your extension.
Search & Filter
Type in the search box at the top of the Extensions view. It filters both the INSTALLED and MARKETPLACE sections. The search matches:
- Extension name, repository, and description
- Author name
- Categories (for example, Automotive or Industrial)
- Keywords (for example, CAN or Modbus)
Installing Extensions
Install published extensions with a few clicks:
- Click the extension in the MARKETPLACE section to open its details tab.
- Click Install.
- Configure the extension if it needs settings, then start it. See Managing Agent Extensions.
Requirements:
- Agent extensions need a live workspace connected to a single Zelos Agent. App extensions install without an agent.
- The extension must support your platform (Windows, macOS, or Linux on x86_64 or ARM64).
- The app needs an internet connection to download from the marketplace.
Install extensions from your local filesystem for development and testing:
- Open the Extensions view.
- In the MARKETPLACE header, click ⋮ and choose Install Local Extension.
- Select the extension folder that contains
extension.toml. - The extension installs on the agent on this computer, with the ID
local.<name>.<name>is a slug of thenamein the manifest. Zelos uses the folder name only when the manifest name gives an empty slug.
The details tab marks a local extension with a Local badge. Two local extensions with the same manifest name get the same ID, so give each one a distinct name.
Development workflow:
- Agent extensions: A local agent extension runs from its source folder. Code changes take effect the next time you start or restart it.
- App extensions: Rebuild the web assets, then reload or reopen the extension's tab.
- To pick up manifest or dependency changes, choose Install Local Extension again on the same folder. If the manifest version is unchanged, Zelos replaces the installed copy and keeps its saved configuration. A new version installs as a separate copy without it.
Managing Agent Extensions
Start, stop, and configure agent extensions from the EXTENSIONS section of the Explorer view. The section appears in live workspaces and lists every agent extension installed on the connected agents. With more than one agent connected, the list groups extensions by agent and shows how many are running in each group.
The Extensions rail item opens the marketplace view, where you install, update, and uninstall extensions.
Starting & Stopping
Each row in the EXTENSIONS section has a start or stop button and a Configure extension button (gear icon). Click the extension name to open its details tab.
Start an extension:
- Click the green play icon on a stopped extension.
- The icon changes to a red square while the extension runs.
- The extension's signals and actions appear in the SIGNALS and ACTIONS sections.
Stop an extension:
- Click the red square icon on a running extension.
- The extension process stops.
- Its actions leave the ACTIONS section.
Restart an extension:
- Open the configuration dialog and click Save & Restart, or
- Open the command palette, choose Manage Extension Runtime..., and pick the extension's Restart command. The same list has a Start or Stop command for each extension.
Extension States
Extensions show different indicators based on their state:
| State | Icon | Description |
|---|---|---|
| Running | Red square | The extension is running. Click the square to stop it. |
| Stopped | Green play | The extension is installed but not running. Click play to start it. |
| Error | Amber warning | The extension stopped with a nonzero exit code or a signal. |
| Processing | Spinner | The extension is starting, stopping, or restarting. A Restarting… line appears under the row during a restart. |
Crash Detection
Zelos detects when a running extension stops without you stopping it. When that happens:
- A toast says the extension stopped unexpectedly and shows the exit details.
- An amber warning icon appears on the extension's row in the EXTENSIONS section.
- The toast's View log button opens the extension's log file.
Exit details shown in the toast:
- Exit code: for example, "Exited with code 1".
- Signal: for example, "Killed by SIGKILL".
- Agent: for an extension on a remote agent, the toast also names the agent.
Click the amber warning icon or View log to open extension.log. For an extension on a remote agent, Zelos first asks where to save a copy of the log, then opens that copy.
Crash State Clears on Restart
The error state automatically clears when you start the extension again. If the extension keeps crashing, check the logs to identify the root cause.
App Extensions
Some installed extensions add their own app UI. Each one appears as a launcher in the rail's ⌄ menu, with a NEW badge until you first open it. Pin a launcher to give it a rail icon. Click the launcher to open the extension in its own tab. You can also open one from the command palette with Apps....
To uninstall an app extension, open the ⌄ menu, click ⋮ on its row, and choose Uninstall. The Uninstall button in its details tab works too.
App extensions are useful for dashboards and workflows that need more room than an action or a streamed signal. They are sandboxed web projects. You install them like other extensions, but they never start, stop, or restart as agent processes, and they do not appear in the Explorer's EXTENSIONS section.
Configuration
Many agent-hosted extensions accept user configuration for API keys, settings, and preferences. The app generates this form from the extension's config.schema.json.
Configure an Extension:
- In the Explorer's EXTENSIONS section, click the gear icon (Configure extension) on the extension.
- The configuration dialog opens with the extension's settings.
- Fill in the required settings.
- Click Save & Start if the extension is stopped, or Save & Restart if it is running.
What happens when you open and save the dialog:
- Zelos loads the last saved configuration for that extension on that agent, when one exists.
- With no saved configuration, the form shows the defaults from the extension's schema.
- If the saved configuration can't be read, a warning says the form shows the defaults.
- A successful save closes the dialog and refreshes the extension's state.
- A failed start or restart keeps the dialog open and shows an error toast, so you can correct the values and retry.
- An extension without settings shows "This extension does not have configuration options."
Form helpers that extensions can add:
- Auto-configure: Some extensions put an Auto-configure button at the top of the form. It runs the extension's own detection and fills in the fields it finds, such as a connected device. The other fields keep their values. Review the result, then save. A note beside the button explains a failure or describes what it filled in.
- Scanned values: Some fields have a Choose button next to the text box. It lists values the extension scanned for, such as available interfaces, and you can search the list. You can still type any value. If the scan fails, the field stays a plain text box with a hint that says why.
- Collapsed groups: Some groups of rarely changed settings start collapsed behind their title. Click the title to expand the group. A collapsed group opens on its own when one of its fields has an error.
Auto-configure and scanned values work before the extension has ever started. They can only run the configured extension's own actions.
Configuration Tips
- Hover the help icon next to a field label for its description.
- An asterisk (*) marks a required field.
- Invalid values show error messages below the field.
- If a dropdown or other popup field is open, close it before you click outside the dialog.
- App extensions do not use this configuration dialog.
Inspect Config from the CLI
Use zelos extensions config <id> to print the extension's schema and last saved configuration without opening the app. See the CLI reference.
Using Agent Extensions
Once running, extensions stream data and provide controls through the Zelos SDK.
How Extensions Work
Extensions use the Zelos SDK to:
- Define event schemas - Specify signals with types and units (e.g., CAN messages decoded into engineering values)
- Stream data - Push events to the agent in real-time (e.g., sensor readings at 1kHz)
- Provide actions - Expose commands users can trigger from the app (e.g., send CAN message, reset device)
This data appears in your workspace just like data from your own SDK-instrumented applications.
Signals from Extensions
A running extension's signals appear in the SIGNALS section of the Explorer view. The tree groups them by agent, then source, then event, then field. The agent level appears when more than one agent is connected:
📁 Agent (e.g., "localhost")
  └── 📁 Source (e.g., "can_bus", "sensor_1")
      └── 📁 Event (e.g., "motor_status", "measurements")
          └── 📊 Field (e.g., "rpm", "temperature")
Add signals to panels using the same workflows as any other data:
- Drag signals onto an existing panel or into empty layout space. A whole event of logs opens a Log panel, and most other signals a Plot.
- Multi-select signals and drag them together.
- Double-click a field to create a new Plot panel.
See The Explorer View for details.
Actions from Extensions
Extension actions appear in the ACTIONS section of the Explorer view in live workspaces. Drag an action into the layout or double-click it to open it in an Action panel. Actions let you:
- Send commands to hardware (e.g., "Set motor speed", "Trigger capture")
- Configure parameters in real-time (e.g., "Update PID gains")
- Execute test sequences (e.g., "Run calibration routine")
Each action generates interactive parameters from the extension's schema, with proper types, validation, and help text.
Updating Extensions
Automatic Update Detection
The app checks for extension updates in the background. When an update is available:
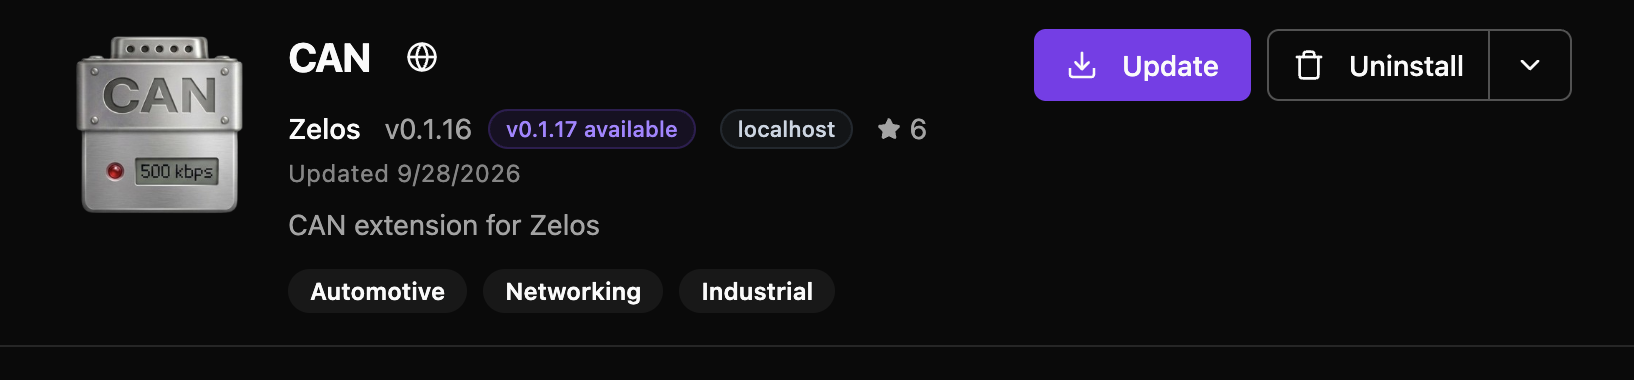
- The extension's row in the INSTALLED section shows an Update badge.
- The Extensions rail item shows a NEW badge. Its tooltip reads "Extension updates available".
- The details tab shows the new version, for example "v1.2.0 available".
Manual Update Check
Run an update check right away:
- Open the Extensions view.
- In the INSTALLED header, click ⋮ and choose Check for Updates. The menu appears only when at least one extension is installed.
- A toast reports the result: "Extensions are up to date" or the number of updates available.
The command palette has the same check as Check Extension Updates.
Installing Updates
Update an Extension:
- Stop the extension if it is running.
- Click the extension in the INSTALLED section to open its details tab.
- Click Update. The button appears only when an update is available.
- Wait for the "name updated" toast, which names the new version.
- The extension stays stopped. Start it to use the new version.
Stop Before Updating
Extensions must be stopped before you update them. While an extension runs, Update and Uninstall are disabled and the details tab reads "Stop the extension before updating or uninstalling".
Reinstall and Uninstall
The Uninstall button in the details tab removes the extension. For an agent extension, the arrow next to Uninstall opens a menu with two more items:
- Reinstall: Rebuild the extension's runtime environment. Stop the extension first.
- View log: Open the extension's
extension.log.
Multi-Agent Limitations
When more than one agent is connected, some agent-extension operations are disabled to prevent accidental changes. The details tab reads "Connect to a single agent to manage this extension".
- Install: Disabled.
- Update: Disabled.
- Uninstall and Reinstall: Disabled.
Operations that stay available with several agents connected:
- Start and Stop: Control extensions on any connected agent.
- Configure: View and change each agent's extension settings.
- View log: Open the log of an extension on any connected agent.
Managing Extensions Across Agents
To install, update, or uninstall extensions, connect to a single agent.
Troubleshooting
Extension Won't Start
Common causes:
- Configuration required: Open the configuration dialog and fill in the required fields.
- Platform incompatibility: Check that the extension supports your OS and architecture.
Steps to resolve:
- Click the extension to open its details tab.
- Read the README for configuration requirements.
- Open the configuration dialog and check that every required field is filled in.
- Check the extension log. Click the amber warning icon, or choose View log from the menu next to Uninstall in the details tab.
Configuration Dialog Won't Close
If the configuration dialog feels stuck open:
- Close any open dropdown or other popup field first. The dialog ignores outside clicks while those controls are open, so a stray click does not dismiss it.
- Check for inline validation errors below the form fields.
- If you clicked Save & Start or Save & Restart, wait for the operation to finish. The dialog closes only after the extension starts or restarts successfully.
- If the request fails, read the error toast, correct the configuration, and try again.
To inspect the last saved configuration outside the UI, run:
Extension Keeps Crashing
If an extension repeatedly stops with an amber warning icon:
- View the log: Click the amber warning icon to open
extension.log. - Check the exit details: The toast shows the exit code or signal.
- Common exit details:
- Exited with code 1: A general error. Check the log for details.
- Exited with code 137: The process was killed with SIGKILL, often because it ran out of memory.
- Killed by SIGKILL: The process was force killed, for example by a memory limit or by hand.
- Killed by SIGTERM: Something asked the process to terminate.
- Verify the configuration: Invalid settings can make an extension exit at once.
- Check dependencies: Look for missing or incompatible packages. Reinstall rebuilds the runtime environment.
Extension Logs Location
Logs are stored at <data>/extensions/<id>/<version>/extension.log on the agent's computer. Click the amber warning icon for quick access.
Cannot Install Extension
A failed install shows a "Couldn't install name" toast with one of these reasons.
"name doesn't support your system":
- The extension has no package for your OS or architecture.
- Check the details tab for supported platforms.
"Network error. Check connection and try again.":
- Check your internet connection.
- Check that your firewall allows marketplace access.
- Try again in a few moments.
"name is already installed":
- The extension is already in the INSTALLED section.
- Use Update instead if you need a newer version.
Creating Extensions
Build your own extensions to share integrations with the Zelos community.
Why Build an Extension?
Package your integration work into a reusable extension:
- Share protocol decoders - CAN, Modbus, custom binary formats
- Distribute hardware drivers - Test equipment, sensors, actuators
- Provide workflows - Automated test sequences, calibration routines
- Build integrations - Cloud services, databases, external APIs
Extensions use the Zelos SDK's event streaming and action system, the same tools you use to instrument applications.
Getting Started
The fastest way to create an extension is the built-in creator in the app:
- Open the Extensions view.
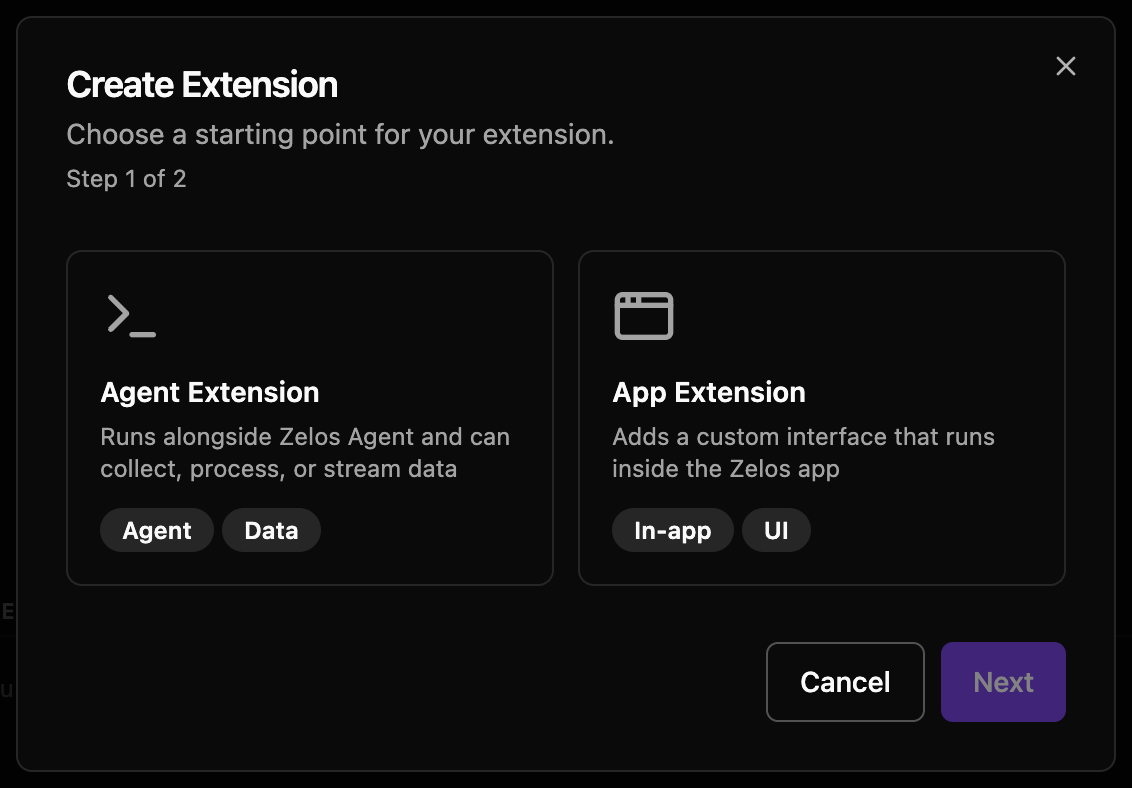
- In the MARKETPLACE header, click ⋮ and choose Create Extension.
- Pick a template, Agent Extension or App Extension, and click Next.
- Enter an Extension Name (lowercase letters, digits, and hyphens) and an optional Description.
- Click Create Extension, then pick the folder for the new project.
- Zelos generates the project and installs it locally. If the install fails, the result shows a warning and the project is still created.
The last step shows the project path. Click Open to open the folder, or Documentation or Marketplace for next steps.
Follow the Extension development guide for more information. The generated projects include working examples, development tools, CI/CD workflows, and everything needed for production-ready extensions. Agent templates are Python-focused; app templates use React, Vite, and @zeloscloud/app-extension-sdk.
Next Steps
-
Shared guide plus dedicated agent and app extension pages
-
Learn the SDK that powers all extensions
-
Browse all available extensions online
-
Official agent and app extension templates used by
zelos extensions create -
Access and manage extensions from the left sidebar